SUMMERLANDS CHUFFERS


Pearse Earl - Improving the Chuff
If you fancy improving the Chuff on your Pearse Earl, then here is a detailed and fascinating account by David Pearson, detailing how he went about it and some of the thinking behind it.
Abstract
In November 2017, Chris Bird of Summerlands kindly offered to assist me with a project to see if we could make the exhaust beat of my Pearse Earl deeper and louder.
To give some real-life context, this video shows the real locomotives working hard and their normal speed and exhaust beat. See Video 1
The normal chuffer fitment on this loco sounds really good (See fitting notes here), it could have been a tall order to find room for improvement; Chris said he “...always enjoyed seeking the best chuff” so we set off on a journey of discovery.
In summary we mostly achieved our aims; there was a big increase in loudness and the chuffer’s best operating range, allowing it to create a very loud and thumping beat over the full range range of the locomotive’s speeds and working pressures. The downside was a lazier blast plume. The change in exhaust pitch was more subtle but sounded at least as good as the unmodified version.
Options
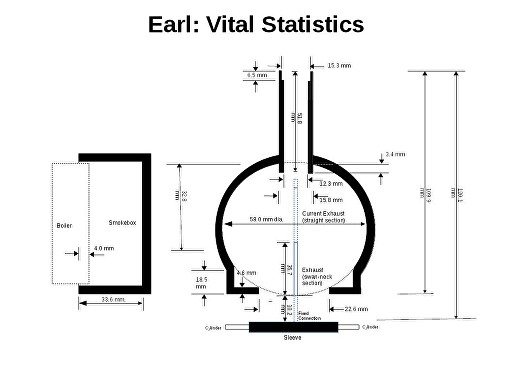
This locomotive normally uses the 1/4“ SCGP1-25 chuffer. I gave dimensions of the chimney and firebox to Chris (see picture right) and he did some calcs to see if we could fit a larger diameter chuffer; sadly this was not possible as the next size up was slightly too big.
The remaining options were to do nothing and leave it as it was or to modify the loco. We were both up for trying to improve it so we went down the modification route, but in a way which would allow it to be returned to its original state should it prove unsuccessful.
Video 1
Baselining
I baselined the performance of the 1/4“ chuffer. The recommendations are they work best with a good load, lower working pressures and lower speeds, so I made up a test train with 12kg of weight. I found 20psi working pressure was too low because plume was too wet and 40psi was too high because the chuffer lost its throaty exhaust thump and became a more continuous blast.
I found the best sound came from around 25-30psi (which was my normal operating pressure anyway) and a speed of anything between a crawl and half of its capable speed; see Videos 2 & 3 for examples.
For a given diameter, pressure, and steam velocity, the exhaust note should be roughly inversely proportional to the chimney length; i.e. doubling the length should halve the frequency. Using the dimensions I sent, Chris came up with a design for an extended chimney, increasing its length by just under 50%.
I cleaned out the old chimney of any deposits then took more accurate inside measurements. To ensure a smooth surface throughout the new chimney’s length I created the extension on the lathe with a collar to fit and bored it to the exact diameter of the old chimney. It could have been made with a piece of thin tubing but I wanted to properly test the principles by removing possible causes of acoustic problems, such as a step between tubing and chimney at the join between the two parts affecting the waveform.
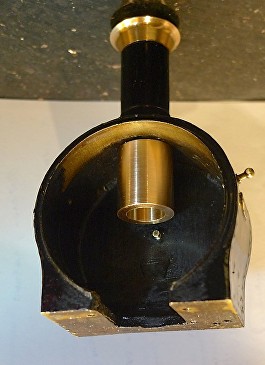
This picture shows the extension when fitted; by blowing over the top of the chimney like a flute a much deeper note could be heard than before.
Video 2
Video 3
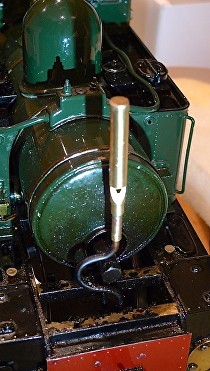
The chuffer was moved a bit lower on its exhaust pipe, putting it in its theoretical best position for the new chimney length. I also faced the chuffer outlet forwards initially. The actual ideal position is not just based on the pipe, it depends on the pipe ends, the surrounding air, and the fluids you are pushing through it. Unless you are prepared to do some complex fluid simulations on your computer, acoustic designers will tell you there is currently no reliable way to find this exact sweet-spot position without some real-life testing and tweaks [Ref: Talbot-Smith, Michael (1999). Audio Engineer’s Reference Book (2nd ed.). Oxford]
(That's what I have fount too! Ed)
Results
The first round of testing wasn’t very successful. You could hear and see that the fuel gas was not burning properly, the sound was poor and operated over a narrower band than the unmodified version. Chris deduced that something was probably disrupting the airflow.
For the second round of tests, I dragged the locomotive and family to the South Devon Garden Railway track at Buckfastleigh (http://www.sdgrg.org.uk); we had the track to ourselves all day because none else was daft enough to risk the weather. After some good runs and tweaking the loco on the fly, I got the results we were looking for; the final configuration was with the chuffer outlet facing towards the rear and repositioned slightly lower into the chimney.
The change in volume and operating range was spectacular, the chuffer now creates a very loud and thumping beat over the locomotive’s full range of speeds and working pressures; the downside was a lazier blast plume. The change in pitch was less noticeable but was at least as good as the unmodified version so had no complaints. I don’t claim to be an expert on acoustics but the improvement in the operating range could be due to the new aspect ratio (length : width ratio) of the chimney, a known effect in higher aspect ratio organ pipes and whistles [Ref (i) Liljencrants, Johan. (2011) Organ pipe sensitivity to pressure, Ommundsen, Peter (2003), Ref (ii) "Effects of pressure on whistle frequency". Horn and Whistle (101): 18]
Please note these outcomes are subjective and personal preference as to what ‘good’ means. If you are considering this modification you may wish to decide first whether visuals or noise are more important to you, or possibly consider the new FX version of this chuffer to allow you to vary between the two.
Video 4 shows the new top end of the range the chuffer operates well at; in this case running flat out with pressure close to 50psi. Hopefully the volume speaks for itself; the locomotive is around 60ft away at the start, the burner is also running higher and much louder than in the unmodified videos and it has been completely drowned out. In the pause you might also notice it was also drowning out the noise of the old heritage diesels in the full-size yard next to this track. With a good ear you can pick up a subtle deeper exhaust note when the loco is passing.
Many thanks to Chris for his kind help on this successful project.
David Pearson
30th January 2018
Video 4