SUMMERLANDS CHUFFERS


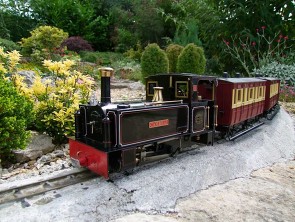
Roundhouse Charles Pooter and Carrie
1. Charles Pooter (please also see the link to my Charles Pooter project under My Projects)
David Turner tackled the fitting of a Chuffer to his Roundhouse Charles Pooter. This is more complex than many as this loco is a "pot boiler" and the chimney flue extends down through the boiler. Here are his notes:
1. Turn loco on its back. Dismount the meths burner by unscrewing a single
screw at the rear and pulling out the split pin from the middle. Note that
the 'V' mounting that held the split pin has a screw to hold it on to the
chassis. This screw will need to be removed to release the boiler band and
allow the boiler to rise.
2. Remove the body shell. This is effected by unscrewing two screws on the
front footplate and two on the rear floor of the cab. If like mine your Pooter
is radio controlled, you may find access to these screws is restricted by the
R/C receiver if it is mounted on the cab rear wall. It probably will be since
this is the obvious place for it.
3. Before lifting the body shell you need to remove the dart handles from the
smoke box door . They merely pull out. In addition, if radio controlled, you will have to release one servo activating link from the regulator.
4. Now the body shell may be lifted off but may still be connected by an
umbilical cord of wire between the receiver and reversing servo. This should be
long enough to stay connected and still allow good access, since whoever fitted
it in the first place would have needed a good length to enable fitting of the
R/C.
5. Turn chassis upside down and unscrew single screw to release the boiler
band. In my Pooter, the superheater pipe is long and double coiled so that it
was not necessary to disconnect any pipe work. You may find in your model that
this is less easy and therefore you may have to disconnect one junction of the
lubricator at this stage.
6.The twin exhaust pipes are combined by a single thin walled sleeve that
rises up the chimney. This is lightly crimped at the bottom but releases easily
enough with a little squeeze side to side with pliers and pulls off. I found my
pipes set at different levels but soon realised that they could be levelled
without cutting. I was able to fit the Summerlands Chuffer without a problem and
it was easy enough to replace the boiler. While the two to one adapter fitted to
the chuffer is wide, it still fits up the chimney stack leaving reasonable room
around it. Note that in the Pooter,. the chimney pipe extends right through the
smoke box so from a sound point of view it ought to work as long as the 'organ
slot' is within this. Theoretically therefore, it could be better to cut the
exhaust pipes so that the adapter was lower, causing less obstruction in the
chimney stack. (The position will not be crucial as this is a pot boiler - probably best to aim to have the top of the Chuffer between 5 and 10mm from the top of the chimney CB)
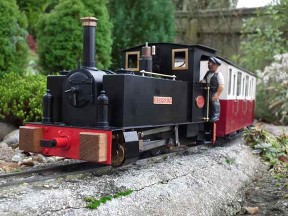
2. Roundhouse Carrie
Here are some brief notes to help with the fitting - I will try to add some photos - but some of the dismantling stages are described in Tag Gorton's Live Steam Workshop from Atlantic Publishers.
1. First remove the two sand boxes and put somewhere safe with the two screws.
2. The side tanks are each held on with a screw under the footplate - just in front of the cylinders. When these screws are removed, the tanks can be lifterd and unclipped from the cab. Put them on one side.
3. Now remove the smoke-box by undoing the single fixing screw in front. The smoke-box will then lift up and off the twin exhausts. Again put it to one side (or degrease and spray it matt black as Tag suggests!).
4. You will now see the boiler wrapper comes right to the front of the smoke-box. Loosen the clamp screw at the front, underneath and remove the blanking disc to reveal the exhausts. I found I needed to ease the wrapper apart to free the disk - I used circlip pliers.
5. Now place the smoke-box next to the boiler and mark the exhausts for cutting, 72mm down from the top of the chimney.
6. Cutting is a little awkward as it has to be done inside the wrapper. Hold the pipes as firmly as you can and protect the loco paintwork with card or cloth. Either cut with a cutting disc on a Dremel type drill, or use a cut down, fine hacksaw blade. I found that hinging the pipes forward and using a 3 cm cutting disc (after protecting the boiler with a reag behind the pipes) made it a very easy job.
7. Clean up the ends with a fine file and square them up if the disk has cut at an angle.
8. Now push the chuffer on and give a light tap to seat it.
9. Test the smoke-box in place to ensure that the slot is clear of the chimney walls and bend the copper connecting tube if necessary.
10. Reassemble in the reverse order.
You can see Chris Hillier's Carrie in action on the right.