SUMMERLANDS CHUFFERS


Roundhouse Hunslets: Linda, Blanche & Charles
Dave Herning is not the first to fit a Chuffer to one of these fine locos but he is the first to take the time to take photos and provide the following comprehensive notes. And if you scroll down to below the photos, there are Keith Greenwood's notes on his fitting experience.
First - here are Dave's notes:
1/ Remove buffer beam and vac pipe stand,only held on by to slotted screws,nuts are behind and easy to reach,this makes it easier to remove two screws holding smokebox on.
2/ Remove 2 8BA screws and washers holding front of smokebox and lower plate to chassis.
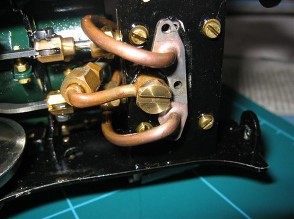
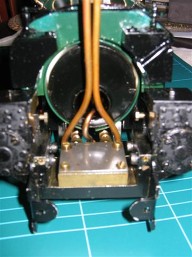
3/ Under chassis remove 3 8BA screws and washers holding exhaust pipe flange to valve block assembley to allow smokebox to lean forwards and clear sand boxes on tank front. (see top left photo)
4/Remove smokebox and measure exhaust pipes to detrmine length for cutting.chuffer needs to finish about 5mm from top of chimney [I removed 60mm from top of pipes]
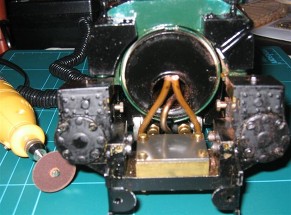
5/Use a small cutting disc in a Dremel type tool,clean cut ends and open steam pipe hole of debris,trial fit chuffer to pipes.Pipes may need slight bending to achive good position and bring chuffer to correct height.
6/Fit chuffer to loose ends and make sure fully seated,if in doubt mark line at bottom of chuffer mtg boss and remove to inspect depth of engagement.
7/Refit smokebox to frt of chassis leaving exhaust pipes loose on flange to allow them to swivel into postion,slight lifting of tank and sand boxes will help to ease in smokebox as its moved into place.
8/Refit 3 8BA screws and washers to exhaust pipe flange under loco chassis,carefully bending exhaust pipes to help in ftg to valve block,keeping flange square to block and tighten.
9/Refit buffer beam and vac pipe stand,you may need a pair of neadle nose pliers to hold the 2 .brass nuts whilst you tighten the screws
And now here are Keith Greenwood's fitting notes:
Before I fitted the chuffer I painted the top and about 3mm down the top sides with black paint. My "Linda" is from a 2008 batch.
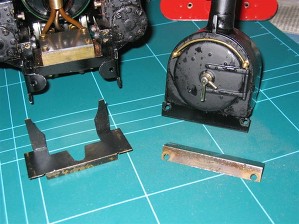
1. Remove buffer beam - two screws, one either side of centre buffer. They have nuts on the back that you can hold onto while undoing the screws.
2. Remove black L plate behind which has the vacuum pipe assembly hooked into the front left. These are just screws, no nuts on reverse.
3. Gently pull the smokebox forward and up, there is a little resistance from the exhaust pipes but only whilst the smokebox is coming forwards, be careful not to scratch the sandboxes.
4. Measure and cut exhaust pipes making sure to put some card etc. in front of the sandboxes to protect them - I used a small hacksaw and cleaned up the ends with a file. I also used to nail in the end of the pipes to make sure it was cylindrical and free of any metal filings.
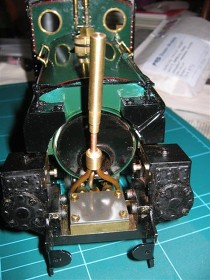
5. Fit the "Chuffer". I had to bend my exhaust pipes a little as they were not similar in shape going up to the chimney.
6. Place the smokebox on top of the left sandbox and look from the right hand side of the loco, you will be able to work out where the chuffer needs to be bent to to go up the centre of the chimney.
7. Slide the smokebox down and back into place.
8. Check the position of the chuffer, alter if necessary, i managed to get it central by using the end of very small flat ended screwdriver down into the chimney to ease it into the centre.
9. Replace black L plate with the two screws.
10. Replace buffer beam, you may need some pliers etc to grip the nuts from behind as there is limited space for fingers.
I managed to get the red painted bufferbeam screws back on without paint damage, it may be necessary to dab a bit of paint on these if the paint comes away on your model.