SUMMERLANDS CHUFFERS


Roundhouse Mountaineer and Alco
Thanks to the kind assistance of Rob, the designer of this Roundhouse loco and John Hancox who acted as "guinea pig", I have the following fitting notes for fitting the SCRH6 Chuffer. Please note that it is necessary to remove the tanks and smokebox and to cut the exhaust to fit the chuffer. If in doubt, please seek help.
1.Undo the two retaining screws on the front buffer beam and remove the beam. As with all the parts removed, put them safely in a container.
2.You will now see that the front footplate is held in place by a lug on either side of the frame. Loosening the screws on the frame spacer will allow the front footplate to be slid forward and removed.
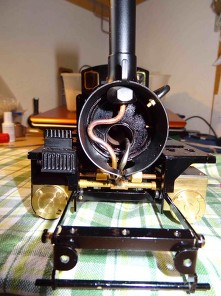
3.This reveals a screw under the smokebox wrapper which secures the smokebox front in position. Unscrew this screwand you will be able to slide the smokebox front out to reveal the single exhaust which is curved to one side before entering the chimney.
4.Next remove the tanks (which is easier than it looks). First unscrew the chequerplate ‘bridge’ between the tanks by removing the M2 screw. Next locate the two fixing screws, one either side at the rear of the tanks. Remove these and the tanks can be slid backwards towards the cab and lifted clear.
5.Before moving on, look carefully at the exhaust. We need it it be straight and vertical where it enters the chimney as it has to be cut and the 8mm deep fitting on the Chuffer has to be fully pushed on so that the bottom of the chuffer is about level with the bottom of the chimney in the smokebox.
6.It may be necessary to bend the exhaust to achieve this, either by gently increasing the angle of main curve so that it lowers the top of the exhaust, or by simply straightening the pipe, where it is inside the chimney (when the smokebox has been removed). (See * note below)
7.Next you will need to remove the smokebox. First remove the two M2 screws (one either side). Then remove the nut holding the dummy blower tube onto the smokebox and remove this by sliding it out from the front of the cab.
8.Now raise the running plate slightly so that you can unclip the right hand cylinder cover to give access to the clamp screw and nut at the rear of the smokebox (underneath). Remove the screw and nut completely. You can now ease the smokebox forward and slide the rear clamp tags past the superheater pipe. The smokebox can then be moved up around the exhaust tube and lifted clear. If necessary, you can remove the screw holding the front pony truck to make this easier.
9.Now decide what bending will be necessary to give about 8mm of straight vertical exhaust inside the chimney. When pushed on to this, the Chuffer will be level with the bottom. If necessary hold the smokebox in position and double check before marking the pipe, protecting the boiler with some card or wood and cutting the exhaust with with a junior hacksaw.
10.Clean up the end of the pipe with a fine file and push the chuffer firmly on.
11.Replace the smokebox, but before going any further, look down the chimney to see that the slot, indicated by the scratch on the top, is clear of the chimney wall. Either turn the chuffer or bend the exhaust if necessary.
12.Now reassemble in reverse order. The rear clamp screw is awkward to replace so it may need some ingenuity*! When all is back together, steam up and enjoy the sound.
*Mike Maguire has sent the following note on this:
I've just fitted a Chuffer to my Mountaineer. With the help of your fitting notes, it all went pretty well. I found it easier to straighten the exhaust pipe than bend it even further.
In para.12 (last) it’s noted that re-fitting the rear (boiler-end) wrapper nut-and-bolt presents a tricky access problem. I thought you might be interested to know how I solved it.
I cleaned and tinned the outside face of the nut-side lug and soldered an 8BA brass nut to it, using an 8BA steel bolt through both lugs to hold it in place during soldering.
I then removed the last 2mm or so of thread from a 1/2 inch steel 8BA bolt to create a guide pin.
Using a dab of blu-tack and a long screwdriver, this bolt can be easily inserted (chassis lying on its side) – the guide pin ensures proper alignment and freedom from cross-threading.
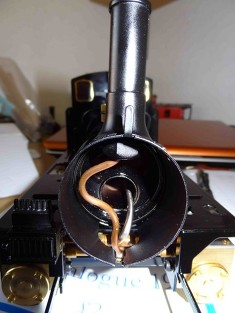
Above you can see the exhaust enters the chimney on a bend and below you can see that it needs adjusting to get a straight, vertical section at the bottom of the chimney.
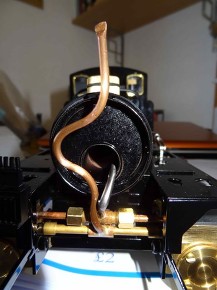
Here John Hancox has sharpened the bend to lower the exhaust and give the necessary straight pipe. The cut here is about 8mm up from the bottom of the chimney in the smokebox.