SUMMERLANDS CHUFFERS


Accucraft NGG16 Garratt
Stuart Timms is the first to successfully fit Chuffers to an Accucraft Garratt NGG16. This has required a fairly straightforward modification to divide the two exhausts in order to to feed the front one through a standard SCGP1 and the rear one through through a second exhaust pipe created in the smoke-box. This first installment covers this fitting which will produce half the correct number of chuffs.
To get the correct number of beats, Stuart has added the option of disconnecting this new exhaust and substituting a prototype Chuffer/Resonator* mounted beneath the firebox. He has found that this works well and in the warm weather there is an acceptable amount of steam under the loco. In the Winter, however, when the visible exhaust steam from the resonator will be considerable, he can revert to the single one. He plans to fit a diverter valve to allow the him to switch between the Chuffer/resonator and the simple exhaust at will.
So here is Stuart's first installment detailing the fitting of the front Chuffer:
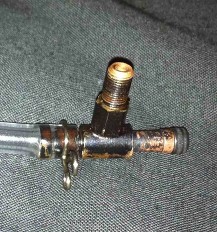
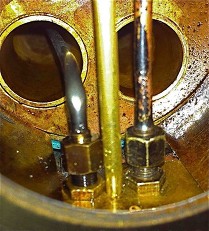
Photo 1 - Plugging the exhaust T
This shows the T piece steam fitting for the exhaust under the smoke box. The rear end needs to be plugged up. I used a 3mm threaded allen head bolt after I had tapped a 3mm thread inside the t-piece. The other option is to put a small piece of silicone rubber tube with a bolt inside it to block it up. You would need clips to clamp the bolt inside the tube and the tube onto the t-piece.
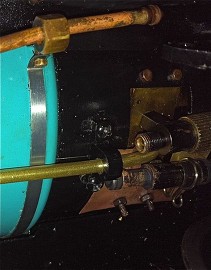
Photo 2 - Making the second exhaust.
For this exhaust to vent into the smoke-box, I used a 300mm long piece of 1/8th brass tube (brass because Stuart had it - you could use copper - ed)). The end has been squeezed up in a vice so approx 3mm of flat tube is left. A 1.6mm hole was then drilled in the tube part just below the flat section of the tube. This is for the steam to exhaust. (I don't have a picture of what the end looks like, but it's the same as the end of the original pipe that will be cut to fit the chuffer) .
The photo shows how this tube it fitted under the loco. A 4mm hole was drilled between the two t-pieces (4mm to accomondate the flat section of the tube). With hindsight i would recomend that it is drilled either slightly behind or slightly in front of the t-pieces as it can make difficult work to unscrew and screw the original pipe with chuffer in place (unless the chuffer is fitted in place first). The 1/8th pipe was approx 300mm long and was bent (very carefully - it woud be easier with copper! ed) at 150mm fom the unsqueezed end. My garratt is radio controlled, so the forward and reverse shaft wasn't needed. The front mount that holds it in place just happens to have a 1/8th hole in it so the tube was slid into place and bolted up. i'm sure you will agree this makes it look a very tidy job. If the loco is manual it's still not a problem as there are a lot of areas the exhaust pipe could be cable tied to.
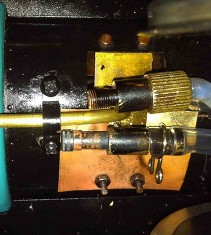
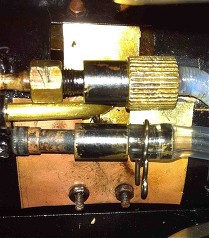
Photo 3
This picture is a close up of the two T-pieces - the lower one blanked off with the Allen bolt. Also note the brass heat deflector plate under that I have added under one side of the smoke box - this is because the exhaust pipes that accucraft supply melt very easily. The steam pipes don't as they are of a ptfe high temperature type so I have since changed my front exhaust pipe for this type of pipe as well as I got fed up changing it. And so far it has survived! The fitting of this chuffer has helped sort out the problem as I only have one pipe to melt now instead of two ;-)
Photo 4 - Fitting the Chuffer
This picture took several attemps to get as it's very tight in front of the smoke box. You can see how tight it is to undo/do up the bolt on exhaust pipe. Once the exhaust is removed it needs to have the top section cut away in order to fit the Chuffer. Measure from the bottom of the pipe (nut end) 55mm and then saw it off. Slightly squeeze the pipe with some pliers and fit the exhaust in place without the chuffer. Just leave the nut hand tight. Now push the chuffer down the chimney and feed it over the pipe. Tap it gently into place until it is approx 4mm down from the top. Now tighten the nut that holds the exhaust into place (please try not to swear at this point). Please note these mesurements work for the chuffer you supplied the SCGP1 if i remember, but don't take my word on it. Also take care to position the chuffer away from the 1/8th exhaust pipe with the chuffer organ pipe hole away from the edge of the chimney so that the chuff isnt muffled.
Photo 5 - another picture of the two T-pieces, now connected up.
Photo 6 - Connecting up
This shows the 1/8th exhaust pipe cable tied to the steam pipe under the boiler. It also shows a bigger pipe (5/32s in size) which is approx 80mm in length pushed over the 1/8th pipe - again the 1/8th pipe was slightly squeezed up with some pliers so the outer pipe got a good purchase. The reason for this is so it is the correct outside diammeter for the rubber tube to fit onto it.
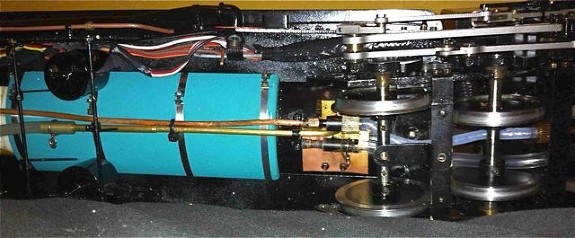
Photo 7
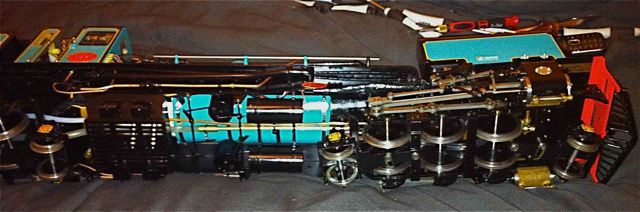
This picture shows the whole exhaust fitting under the loco. also note the rear pony truck from the front power bogie has to be removed to do this work. it is only 2 screws. but be careful not to lose the spring and washers.
Photo 8
Sorry about the quality of this picture. This is the final pic of the complete underside of the loco with the pony truck back in place. Quite a tidy job I think!
So that is the end of fitting a chuff pipe to the front power bogie and an exhaust to the rear power bogie. To fit a second resonator chuffer I just cable tied the chuffer into place and removed the rubber hose from the exhaust pipe and connected it to the second chuffer. I will fit an either/or valve so I can choose between a single chuffer/exhaust or twin chuffers
I hope this helps - as I said this is part 1- I will send part two as I progress."
*The Chuffer/Resonator is an SCGP1 mounted in 50mm of 0.5" K&S brass tube. You can make one by turning a simple boss to mount the Chuffer centrally along the axis of the tube.

1
2.
3
4
5
6... 7